


A Complete Guide on Enabling SSL Certificates & HTTPS on Your WordPress Website.
As network breaches become more common in cyberspace, SSL certificates and HTTPS encryption have become the norm on more than 50% of all websites. Here’s a step-by-step guide on how you can make the switch yourself, encrypting all traffic to-and-from your WordPress website.
Step 1: Getting the SSL Certificate
There isn’t much difficulty in obtaining the SSL certificate itself, but knowing which one to choose can be a different story if you’re not familiar with the different types of SSL Certificates available. First, you should determine what type of certificate you need. If you need protection for a single WordPress blog or website, a single-domain certificate will do just fine. However, if you need protection for multiple domains or subdomains, your choices start to expand. Here’s a quick overview of each of the types of certificates available, as well as their uses:
- Single-Domain SSL – used when you need to protect a single domain (ex: blog, small business website).
- Multi-Domain SSL – used when you need to protect multiple domains under one certificate (ex: multiple domains for various companies) under one certificate.
- Wildcard SSL – used when you need to protect multiple subdomains (ex: email.domain.com, shop.domain.com). This saves money compared to registering each subdomain separately.
- Multi-Domain Wildcard SSL – used when you need to protect multiple domains and multiple subdomains (ex: shop.mydomain.com AND shop.herdomain.com).
Then, you need to decide what level of validation fits your needs. To keep things short, there are three main levels of SSL Certificate Validation that are used today: Domain Validated (DV), Organization Validated (OV), and Extended Validated (EV). The main difference between these certificates is generally the level of verification required to obtain them, but here’s what they’re typically used for:
- Domain Validated (DV) – This is our basic option, which provides basic security for your site quickly (in 5 minutes or less). You can get yours here.
- Organization Validated (OV) – This is a tier above Domain Validated, which associates your Organization Name with your website.
- Extended Validated (EV) – This is considered a “premium” SSL certificate, and requires the highest level of verification to ensure that visitors know your site is secure. An EV SSL certificate will show your company name in the browser address bar, adding that extra assurance for customer trust.
So, Which SSL Certificate Should I Pick for My WordPress Website?
Now that you’re familiar with the different types and levels or SSL certificates, it’s time to pick a combination. Deciding can sometimes be confusing, but the most popular options include:
- If you have a simple WordPress website and don’t want to break the bank (typical for small business owners), then a Single-Domain DV should suffice, such as RapidSSL.
- If you have many subdomains (ex: mail.site.com) under a single domain then a Wildcard Certificate would be the right fit, such as the RapidSSL Wildcard.
- If you want to ensure your customers feel secure in your site and let them know that it has been verified to the greatest extent, then an EV Certificate like the GeoTrust® True BusinessID® with EV is for you.
To get the lowest price, make sure to buy directly from RapidSSLOnline for discounts up to 80% off retail. Click here to take a look at our assortment of SSL certificates.
Get An SSL Certificate For Your WordPress Site – Save 78%
Save 78% on a highly trusted RapidSSL certificate, a great choice for WordPress websites. We offer a 30-day money back guarantee and 24/7 support to help you implement your SSL certificate.
Step 2: Installing the SSL Certificate
Once you’ve purchased your SSL certificate, there’s a few things you need to do to install the certificate on your web server (before you enable HTTPS in WordPress), such as:
- Generate the certificate signing request (CSR) – Check out the guide we wrote on generating your CSR for full instructions depending on your hosting platform.
- Complete validation and generate your SSL certificate – here’s our guide for validating SSL Certificates. After validation, you’ll most likely receive your certificate through email.
- Install the SSL certificate or have your web hosting provider do it for you – here’s our SSL install guide for your hosting platform.
We offer a variety of guides on all things SSL, from purchasing your SSL certificate to enabling SSL and HTTPS on your website. If you need any extra help, feel free to take a look at our support page—our articles are there to help you.
Once you’ve installed the SSL certificate on your web server, the next step is to enable SSL / HTTPS in WordPress.
Step 3: Enabling SSL and HTTPS on WordPress
Enabling SSL and HTTPS on your WordPress website not only encrypts your traffic and makes your site secure, but also lets customers feel at ease when they see a “lock” next to your URL.
To get use of your SSL certificate, you’re going to need to switch your site to HTTPS. Here’s how to do this:
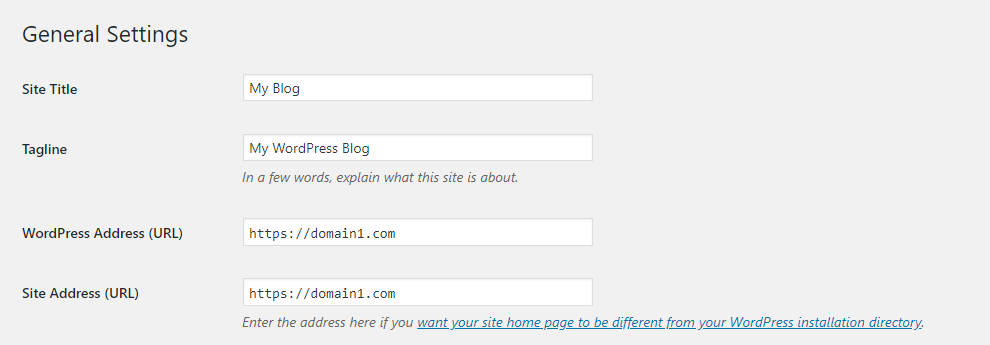
- Go to your WordPress admin page, and click “Settings” and then “General”. On this page, change the http:// to https:// as shown in the screenshot below (domain1.com should be replaced with your domain name)
Step 4: Redirect All HTTP URLs
Redirecting HTTP pages to HTTPS not only ensures that your main site is encrypted and secure to visit, but also protects all URLs on your domain. To do this, you’ll need to add this code to your .htaccess file:
<IfModule mod_rewrite.c>
RewriteEngine on
RewriteCond %{HTTPS} !=on [NC]
RewriteRule ^(.*)$ https://%{HTTP_HOST}/$1 [R=301,L]
</IfModule>
Now your entire website should be HTTPS secured!
If you don’t want to go through the hassle of setting everything up yourself, there are various plugins that can do the whole process of switching to https and redirecting content from http to https. An example of a plugin that does this is Really Simple SSL, which transfers your whole site to HTTPS (without the need for manual redirects!). There are also various Search and Replace plugins that let you search for HTTP content and switches them to HTTPS for you.
Final Thoughts & Tweaks
- Make sure your https redirect is working by checking that all your content is https and not http (this can create “Insecure Content” errors!).
- Make sure that all internal links on your site point to https links (otherwise this can harm your Google ranking!).
- Set up your HTTPS site version in Google Search Console. (You will see traffic disappearing from your HTTP site, but it will migrate to your new HTTPS site as google indexes this now, not your old site).
That’s all! You should now have an HTTPS site with a valid SSL certificate. If you run into any issues or roadblocks, don’t hesitate to reach out to us here, or search our blog here.