Understand SSL Certificate in Google Chrome Web Browser
Google Chrome is a web browser developed by Google. It was released in 2008, and today, its feature-rich profile and innovative aspects have helped it attain the enviable position of being the most popular web browser in the world. As per one survey in July 2014, about 45% of web users prefer Google Chrome over other options available on the market.
The Google Chrome web-browser is efficiently capable of securing online data. By default, the SSL security in Google Chrome is set to the medium, keeping the level not too strict and neither too open. It is advisable for users to not make any changes to these default settings unless required.
Installation Procedure: How to View SSL certificate in Chrome
The installation procedure given below is based on the assumption that users have already downloaded the root certificate to the network location.
Step 1 – To start with the procedure, first of all, click on the icon of ‘Customize and Control Google Chrome’ menu present on the upper right corner of your screen. See Figure A.
Step 2 – Now, click on ‘Options’ menu.
Figure A
Step 3 – From the window ‘Google Chrome Options’, select the tab ‘Under the Hood’ as shown in Figure B.
Step 4 –In that tab, select the ‘Security’ option. See Figure B.
Figure B
Step 5 – Click on the button ‘Manage Certificate’ just under ‘Select trusted SSL certificates’, as shown in Figure C.
Figure C
Step 6 – After clicking on ‘Manage Certificates’, the ‘Certificates’ window pops open, where users can import, export or remove the SSL certificates. Now, click on the ‘Trusted Root Certification’ tab and click on the ‘Import’ button as shown in Figure D.

Figure D
Step 7 – Now, click on the following two check boxes listed below ‘Computer-wide SSL settings as shown in Figure E.
- ‘Use SSL 2.0 – This is SSL protocol’s older version, which is found to be less secure. In spite of that, there are a few websites that may need visitors to use this version during their browsing session. So, users need to select this option only when you trust the website.
- ‘Server certification revocation’ – Clicking on this check-box, turns on the real-time verification for the website certificate’s validity, for extra security. A third-party issuer can revoke a certificate if that certificate is noticed to be stolen or compromised.
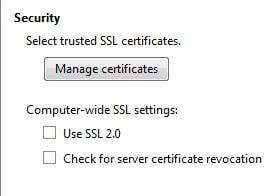
Figure E
Controlled Display of Mixed Content on Secured Pages
Sometimes, the content displayed on an SSL-secured website comes from unreliable sources. Visitors can easily view such content while the web-page loads and the information is being transmitted. There are many types of malicious software that are known to have the potential to modify such insecure contents and make unauthorized changes on websites.
As per the default setting, whenever visitors’ web-browsers come across a webpage with mixed content, an alert icon ![]() is displayed at the end of the address bar.
is displayed at the end of the address bar.
Step 8 – Make the following changes under the section of ‘When there is mixed content on secure (SSL) page”. Users can make changes by choosing any one of the following options in the drop down menu:
- ‘Block all insecure content’: Choosing this option, all insecure images on a page are replaced by broken image icons, and red boxed replace frames and iframes. Nevertheless, by clicking on ‘Show all content’ link present on the top of the page, users can override this setting for some web-pages during their browsing sessions.
- Allow insecure images’: This setting loads all the insecure images on a web-page. However, these insecure images are marked for users’ convenience in spotting them.
- ‘Allow all content to load’: As the name suggests, this setting allows a web-page to load all the web-elements regardless of their security state.
Step 9 – At the end of the procedure, please click on ‘Close’ after making all the changes.